Posted on 22 Comments

Clean Style Deadlift Technique

Having examined Bench Press Technique fairly recently, I wanted to cover another important (and usually improperly done) exercise and that is the clean style deadlift. And while deadlifts are certainly less likely to be seen at the average commercial gym, when they are seen it’s usually a biomechanical horror that makes your back hurt to watch.

I Am Talking Only About the Clean Style Deadlift

To avoid some criticism and annoyances up front let me be clear on what I am and am not discussing.    Specifically, I want to make it clear that this piece is only detailing the clean style deadlift.

I mention this in that, in recent years, other deadlift techniques have become somewhat more common. Rounded upper backs and more of a stiff-legged type of DL are being seen. This seems to be especially true in geared powerlifting and among super-heavyweight lifters. But those are very specific styles of deadlift for every specific purposes.

However, some very very big weights have been moved in a style at least similar to what I’m going to present. A clean style deadlift is the style used specifically by Olympic lifters and, while there are slight differences between that and a clean grip power style deadlift, they are fairly minor.

The biggest difference is what happens into the second pull as the bar passes the knee, Olympic lifters are using the initial pull to set up for the explosion in the second pull, powerlifters are just trying to lock the bar out.

Like the generic raw power bench press, the clean style deadlift is what I’d teach the average lifter looking for strength or size gains, even more so if at some point they were going to learn power cleans. Clearly, this article doesn’t address sumo technique either.

I’m addressing the clean style deadlift as I’d teach it to a general trainee.  Nothing more and nothing less.

Muscles Targeted in the Clean Style Deadlift

The clean style deadlift involves a tremendous amount of musculature and movements around the hips and knees (and even ankles a bit) and involves most muscles in the body. The lower body (quads, hams, glutes) are involved heavily but so is the upper body (lower back, upper back, lats) to stabilize the torso for the pull.

Outside of perhaps the Olympic lifts, it’s arguably true that the clean style deadlift works more muscles than perhaps any other exercise.  In a sense that might be looked upon as good in that it’s very time efficient.  In another, it might be looked upon as bad.  Because in hitting everything to some degree, it doesn’t really hit anything to a great degree.

Clean Style Deadlift Technique: Introductory Comments

The DL generally starts from the floor although it’s not unheard of for lifters to start from the top (taking the bar out of a rack) and beginning the movement by lowering.  Quite in fact this tends to put many lifters in a better position for the next repetition than starting from the floor.  It also tends to let people pull bigger weights since you can get an effect of pre-stretch on the initial lowering.

Powerlifters, in general, don’t do this (since they have to pull from the floor in competition) although at least one elite deadlifter does a workout where he starts a heavier than normal weight from the top position.  But he does this as a way to overload his conventional deadlift.

The deadlift is different than many other movements (such as the squat or bench press) in that it starts from a dead stop position at the bottom. This prevents the lifter from relying on elastic energy, generated during the eccentric to start the bar. This is at least part of why many lifters find that their second repetition of a set of deadlifts is generally better than the first.

Some lifters get around this by dive bombing from a standing position or dipping their hips to get an explosive start.  Both of these are advanced techniques and I’m only mentioning them for completeness. You have to be very skilled to avoid shooting the hips (see below) and losing your starting position with this method.

Perhaps more so than any other movement, the starting position of the DL is absolutely key to a safe and effective pull.  It’s also where a lot of people screw it up. In the version I’m teaching, the following points are important.

  1. Shoulders are directly over or slightly in front of the bar, the grip should be set with the hands slightly outside of the legs so that the arms are as vertical as possible.
  2. Torso is rigid with the upper and lower back set tight and the upper back flat. It is possible to get too much arch in the back for very flexible trainees, but this isn’t common. Most have the reverse problem, rounding out in their upper or lower back, usually due to poor flexibility.
  3. Bar is over the mid foot.
  4. Knees are in front of the bar.
  5. Feet are about hip width with toes turned out slightly, the weight should be felt across the whole foot or slightly on the heels. It should not be felt on the toes

Putting the Bar at the Appropriate Starting Height

Before addressing proper deadlift technique, I want to make a seemingly obvious point. Although I shot these pictures of my lovely model without plates on the bar (to make it easier to see what was going on), I actually made sure that the bar was in the proper position in the start position.

The following picture demonstrates this, showing where the bar would be with 45 pound plates on the bar.

Proper Bar Height
Proper Bar Height


For beginners, the deadlift can actually be problematic in this regard.  For all other movements, the starting weight can be nothing but an unloaded bar.  In gyms with lighter bars, an even lighter weight can be used to first learn the movement.

But this is not possible with the deadlift for the most part.  The bar needs to be at the right height to start.  In most gyms, this means using a 45 lb plate on each end.  Anything smaller will put the bar too low.     If the lifter can’t deadlift 135 lbs (45 lb bar + 2X45 lb plates) they can’t pull from a good starting position.

And not everyone can do this.

Some gyms have bumper plates where lighter plates are the proper diameter but this isn’t universal.  Training plates, 5-10 lb plates of the right diameter can be purchased.  It’s even possible to get wooden training plates made.  But don’t drop them.

In some cases the bar can be placed in the right position in a power rack to start.  Weight can be added until the lifter is capable of doing 135 lbs.

Proper Clean Style Deadlift Technique

The torso/hip position can vary slightly depending on body length, longer legged lifters will typically have to start with their hips a bit higher than those with short legs to get into a proper position. The starting position shown from the side (left) appears below.

Note that the lifter’s upper back is flat or slightly arched, she is also pulling her shoulder blades back to “set” her upper back. She is also attempting to lift her chest slightly (to maintain a proper upper back position).

While there is some debate over proper head position, I find that teaching a neutral or slightly upward looking head position facilitates keeping the chest high and upper back flat and this is what I teach/advocate.

Some great lifters can and have done a proper clean style deadlift with the head looking downwards slightly but it takes a great deal of practice to keep the chest high and not let the shoulders fall behind the hips when the pull is started.

Clean Grip Deadlift Start


Starting with the hips either too high or too low (not shown) are both common problems. With the hips too high, the movement becomes like a stiff legged deadlift off the floor. With the hips too low, the glutes and hamstrings can’t contribute as well, the quads are forced to take over the work. Ideally an even contribution of quads, glutes and hamstrings should occur.

As the bar leaves the floor, the hips and shoulders should initially rise at the same time, keeping the torso angle the same. This occurs through extension of the knees and the bar should move slightly back and upwards as the knees move backwards (out of the way of the bar).

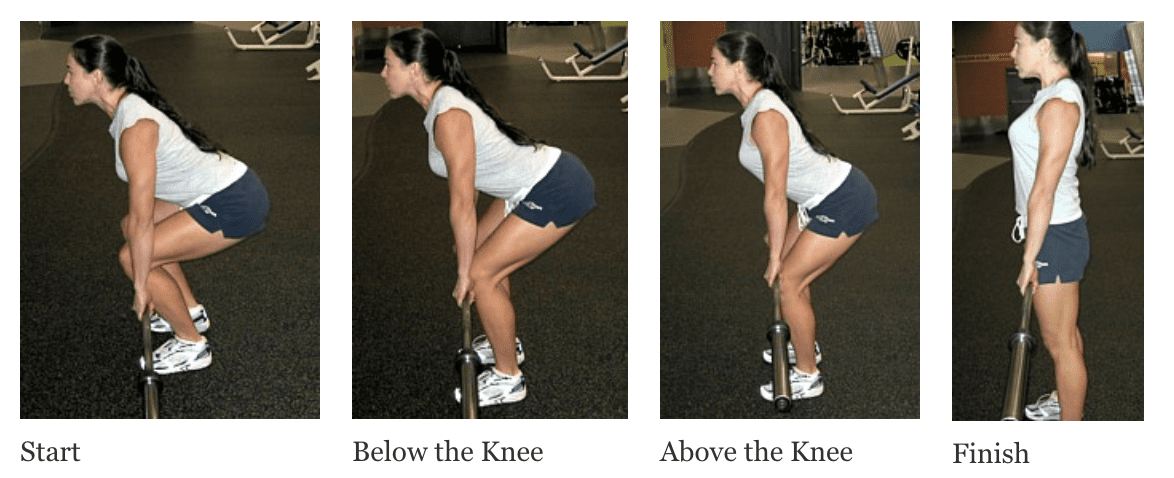
As the bar comes past the knee, the lifter starts to pull the bar back (leading with the shoulders and driving the hips through) sliding the bar up the thigh to lockout as the knees continue to straighten. The below sequence of pictures shows a conventional deadlift from start to finish.

Clean Style Deadlift Sequence


Problems in the Clean Style Deadlift

Ok, so let’s look at a few of the problems that can occur. A very common problem is a rounded back in the bottom position. The low back often tucks (due to hamstring inflexibility) and/or the upper back rounds.

I should note that some top powerlifters feel that rounding the upper back is a better way to deadlift. I suspect that a lot of this is a concession to deadlift suits (which tend to force lifters to round) although rounding will tend to put the bar in a more biomechanically advantageous position as it lets lifters sit into the lift more and get more leg drive. I’m not convinced it is the most healthy technique for the shoulder girdle.

Clean Grip Deadlift Start
Back Rounded
Back Rounded


However, as noted this is an article about clean style deadlifts and that means keeping the back flat and I’m going to address rounding as a technique flaw for this style of deadlift. A proper starting position (upper back flat or slightly arched) is show on the left with a rounded start shown on the right.

Losing the Bar Out Front

Another problem is letting the bar come out from the body. The bar should stay as close to the shins as possible (with many lifters dragging the bar up the shins and using talcum powder to minimize friction).

Not only does allowing the bar to swing out drastically increase the stress on the low-back (in a bad way), it makes it extremely likely that you’ll miss the lift. A proper, keeping the bar in technique, is shown on the left; in the right picture the lifter has let the bar swing far out in front of them.


Above the Knee
Above the Knee
Bar Too Far in Front


Two common problems can occur at lockout. The first is when the lifter fails to get the shoulders back at the end of the lift (or fails to keep them back during the lift). The second is when the lifter leans too far back, hyper-extending the low back. The proper finishing position is shown on the far left, rounded shoulders is in the middle, hyper-extension on the far right.

Finish
Finish
Shoulders Rounded at Finish
Shoulders Rounded
Hyperextension
Hyperextension


Shooting the Hips

A final, and very common, problem is letting the hips raise more quickly than the shoulders.  I refer to this as “Shooting the hips” in the sense that they shoot up at the start of the movement.  However, others use that phrase to describe driving the hips through at the lockout.

This frequently happens if the lifter jerks at the bar or doesn’t think about driving the shoulders up as the bar comes off the floor. Weak glutes or quads can also contribute to this as the body tries to move the hamstrings into a better position biomechanically to stiff-leg the weight up.

Finally, some lifters get so focused on pushing with the legs that they essentially forget to pull their shoulders up and back during the lift. So their butt shoots up into the air and they ‘lose their shoulders’ behind the pull.

As noted above, the hips and shoulders should rise at the same time which means that the torso angle should stay the same until the bar passes the knee. The left-most picture is a correct starting position. In the middle, the lifter has properly started the lift with the hips and shoulder rising at the same speed.

Note that the bar is higher on the shins but the angle of the back to the floor has not changed. In the far right picture, that bar is in the same starting position; the hips have raised without moving the bar off the floor. Note how the angle of the back to the floor has decreased, the back is flatter because the hips have risen faster than the shoulders.


Clean Grip Deadlift Start
Clean Grip Deadlift Below the Knee
Below the Knee
Shooting the Hips
Shooting the Hips


How to Lower the Bar

The descent of the deadlift is a matter of some debate. Technically it should be performed in reverse of what happens on the way up. The torso leans forwards as the knees bend slightly, sliding the bar down the thighs until it passes the knees at which point the bar is squatted down with knee flexion.

As noted above, the second rep of a deadlift often looks much better than the first and part of it is that the hips tend to end up in a more natural position after the first descent.

The big debate is over the speed at which the descent is done. Many deadlifters feel that lowering heavy weights is dangerous and will essentially drop the bar, resetting before every rep.

Others prefer to control the bar down fairly quickly, still needing to reset. Others will use a relatively slow eccentric so that they end up in the proper position at the bottom to start the next repetition. The latter is probably better for mass gains due to the importance of eccentric contractions for growth.

Another argument about deadlifts has to do with reps per set and how those reps are performed in terms of breaks between repetitions. Many powerlifters argue that since the deadlift is done for a single without the benefit of the stretch shorten cycle, it should be trained that way: single reps from a dead stop. From a powerlifting performance standpoint, they may not be incorrect.

A similar argument holds that it’s dangerous to do repetitions in the deadlift since technique will degrade with repetitions (low-back fatigue is usually cited). Maybe.  Lifters who are built for the movement have done them for higher repetitions.  So it can be done.  For most it may not be worth the risk as even small technique deterioration can get risky.

Another issue is what to do between reps. The three basic options are to

  1. Rest completely between reps, reset to a proper lifting position and pull. This treats the set like a series of singles.
  2. Lower the bar into a proper deadlift position, pause briefly on the floor (without losing body position) before starting the next pull. This allows you to get some benefit of the stretch-shorten cycle and is generally a little bit easier than method 1.
  3. Use a touch and go or even small bounce off the floor. For most people, I don’t recommend this; most lifters won’t maintain a good back position.

Each has their pros and cons depending on what the lifter’s goal is. I’d probably say that option 1 is best for those looking to maximize strength as each rep starts from a dead stop, it’s also valuable for powerlifters who pull clean style as each rep is essentially a perfect single.

I think option 2 is probably best for size gains since more tension is kept on the muscles without resting. Option 3 is best left to very advanced lifters since the act of bouncing the plates will throw most people far far out of proper lifting position and they are more likely to get hurt than to get anything of benefit out of the technique.

Let’s Talk about Grips and Straps

Finally, I want to talk about grip a bit (I’ll cover this in more detail in a future site update). Probably the most common grip used for the deadlift is the mixed grip with one hand going over the bar (pronated) and the other under (supinated). This tends to be stronger than either an overhand grip or the hook grip.

However, it also puts a slight torque across the spine and some injuries (including biceps tears) have occasionally occurred. All you have to do is bend the undergrip hand a little bit and you can tear a biceps with any heavy weight.

Another option is to use a double overhand grip which is exactly what it sounds like, both hands grip over the bar; the thumb closes over the fingers in the double overhand grip. This is generally weaker than the mixed grip but avoids torque across the spine of imbalances.

A third option is the hook grip which is what Olympic lifters and some powerlifters use. It is a double overhand grip but the thumbs are pinned under the first two or three fingers. As an Olympic lifter will tell you, the hook grip is stronger than a regular overhand grip. But it is painful when you first do it.

So which is better? As above, mixed grip is probably stronger of the three although you can build a damn strong hook grip if you start early enough. Regular overgrip is the weakest although it can be used if you use lifting straps. If you use the mixed grip, I recommend switching which hand is over and which is under from set to set (it will feel weird at first) to avoid a chronic imbalance through the spine.

What about lifting straps? Hardhead purists will tell you to never use straps to deadlift. And, for a powerlifter who needs to build their grip strength, they may not be incorrect. However, for general training purposes, straps can be beneficial; a bodybuilder or other non-powerlifting athlete shouldn’t let grip limitations hold back the training stimulus to their other muscles.

What I recommend is to try and avoid straps during a workout as long as possible. When you reach the point that grip becomes limiting, strap up. That way, you build your grip and you get the full workout done. This goes for all back work. I’ll cover the proper use of straps in a future article.

Similar Posts:

Facebook Comments

22 thoughts on “Clean Style Deadlift Technique

  1. I’ve really enjoyed your posts on the bench press and the deadlift.

    Both posts have helped clear up a few things I didn’t understand about the lifts.

    Thank you.

  2. Great article, but I’m of the opinion that individual biomechanics usually dictate if someone is more of a back or glute puller. There’s nothing wrong with it, its just that two deadlifts can look somewhat different. There is some wiggle room with the lift, assuming the back does not round. .

  3. As I wrote:

    “The torso/hip position can vary slightly depending on body length, longer legged lifters will typically have to start with their hips a bit higher than those with short legs to get into a proper position. ”

    Lyle

  4. This is great article. For a novice lifter — which I am — I think technique 1 for between lifts is much superior to the others. The only time I hurt my back deadlifting was when I tried #2 — my back had gone out of position without my realising it. Also completely resetting allows you to mentally checklist your form.

  5. I agree, and that’s how I’d teach a beginner. Even touch and go can go awry, lifters often have the plates hit slightly assymetrically (esp with a mixed grip as this tends to change the shoulder position) and they can end up lifting one plate while the other is hitting the ground. Very dangerous. Better to pause, reset and pull.

    With a lot of practice (and a symmetrical lowering), lifters can touch and go while staying tight in the bottom position. But that’s much later into training.

    Lyle

  6. Nice article.

    When I max out (ME) on the deadlift I always make use of the the above mentioned ‘biomechanically advantageous position’ when rounding. This way I can lift a whole lot more weight.

    I don’t use a suit and I’m not a powerlifter.
    Do you think I should I avoid this rounding and stop increasing the weight from the moment the weight is to heavy for me to lift with a straight back?

  7. Great article. I’ve been avoiding dl’s for awhile and this motivated me to try to include them again.

  8. Angelo,

    If you’re not a competiion powerlifter, why are you doing ME work? Why would you potentially risk injury pulling a max single if you have no desire to compete? What is it accomplishing?

    Lyle

  9. During the summer holidays (when the gymnastics hall is closed but the regular university gym is still open) I do ME work mainly because I enjoy working up to a max- something- reps. Whenever I DL I work up to a max single because it doesnt feel comfortable doing more reps with heavy weight and I must say I even feel more save when pulling a single than doing something like 3×3(another reason why I prefer using the ME method).
    You would still recommend a different sets-reps?

    I round my back a bit during the DL because it makes me lift a whole lot more weight.
    If I lower the weight down to something I could pull with a flat back it feels like I’m holding back, but I could be whining.
    Aside from the type of work done, would you advise against heavy rounded back DL for non-powerlifters?
    (I could transfer my questions to the forum if you prefer)

  10. First realize that I’m old and much more conservative now than I once was. I have this crazy idea that keeping a trainee injury free is more important than stroking their ego. That said:

    If one is neither a competitive powerlifter or Ol’er, I see no point whatsoever in pulling max single deadlifts. Moreso if that means putting certain bodily structures (e.g. the shoulder girdle) under potentially harmful stresses. WSBB style ME training in the way you’re describing it does that IMO.

    Lyle

  11. Lyle, you might enjoy knowing that the strength protocol recommended for sprinters by Barry Ross at is the clean-style deadlift, bench press, and some ab work.

    You’d get a kick out of the arguments from people who insist that you MUST do more than this.

    Speaking from the experience of DOING that protocol, though… man, it’s a beast, especially if you train at 85-95% of your 1RM

    Thanks for a great instructional article!

  12. I’m aware of Ross. So far as I can tell he’s mainly good at making really poor arguments on sprint forums and not knowing a whole hell of a lot about what he’s talking about.

    Put differently, I get more of a kick out of watching Ross make a fool of himself by using poor analogies, misunderstanding physics, quoting irrelevant running research (Ross seems incapable of understanding the differences between running on a treadmill and over ground) and then disappearing from forums when his arguments get torn to absolute shreds.

    Lyle

  13. Hi Lyle,

    Well, my point was simply that from my experience, I agree with you: deadlift + a pushing exercise = a very good workout.

    My secondary point is that others agree also. Too bad the one (of many) example I used was someone with whom you have issues 😉

    I wonder if it would have been better/worse/same to say “Stuart McRobert agrees with you also”

    Anyway, thanks again for a helpful and instructional post (it gave me some additional cues to think about when I was deadlifting yesterday)

  14. Regarding the comments about Barry Ross, here is a little history behind what has evolved into some regrettable animosity among genuinely good people.

    The late Mel Siff and I discussed the JAP 2000 sprint findings and their implications on Mel’s Supertaining site– and in private conversations– back in December of 2000. These discussions, in addition to unanswered locomotion questions I had relative to the successes of paralympians Tony Volpentest and Marlon Shirley, who raced at my high school track back in 1997, led me to visit Dr. Weyand at Harvard’s Concord Field Station locomotion lab in 2001 in pursuit of some answers. The fundamental question at the time: how could a young man with no foot and ankle structure for active push-off–or lower arms for correct arm swing– run 22.94 for 200 meters, a time faster than 97% of every able bodied high school athlete I’ve coached since 1975? This debate was taking place more than ten years before interest in Oscar Pistorius and his carbon fiber Cheetah blades. In fact, before Volpentest came to Lisle, I hosted a clinic featuring Tony’s coach, Bryan Hoddle. I called that clinic: Ground Zero: The Role of the Foot and Ankle in Sprinting. The focus was on what the ‘technology’ of the paralypians could be telling us about the mechanical means by which able-bodied spinters achieve faster top end speeds.

    As a result of ongoing communications with Dr. Weyand on these issues, as well as a follow-up visit to his lab at Rice University in 2004, the following eight points formed the basis of the speed training philosophy I had implemented with my high school athletes.

    My relationship with Mr. Ross began after he too approached Dr. Weyand regarding the issues outlined in JAP 2000. Mr. Ross contacted Dr. Weyand, who then contacted me, asking me to share with Mr. Ross any additional insights I had gathered through our correspondences, as well as the information from the full day seminar Dr. Weyand presented here in Lisle in ’02 called: Raising the Speed Limit: What Research Tells Us About Breaking the Barriers.

    I really have no idea how these issues became so controversial, or why the debates on different forums seemed to drift beyond the basic premise of these following points, especially when all of the top applied practitioners, those whom I hold in deep respect and admiration for their career contributions to our sport, appear to be saying fundamentally the same things. Here are my initial eight points, followed by insights from some of most respected coaches in our field.

    1. Based upon our interpretation of the JAP 2000 findings, an interpretation which has met with the approval of the researchers, I believe that applying mass-specific ground force is the mechanism athletes use to take longer strides. Charlie Francis noted the following in his latest manual: “Too many coaches are coaching the speed right out of their athletes. Some believe that it is stride frequency and others believe that it is stride length that causes speed. The answer is neither. They are both measurements of speed but not the cause of speed. Speed is the result of net forces acting on the ground.”

    2. Sprinting comes down to large mass-specific forces applied during brief foot-ground contact times. Charlie Francis has said basically the same thing: “One of the main effects of sprint training is to allow sprinter to achieve the maximum force on the ground in the shortest time possible.”

    3. Body and limb movement during constant-speed level running is performed largely passively by tendons and energy transfers. Isolated drills to improve form are more likely to worsen than improve the economy of running. Dr. Mike Young has noted the following in this regard: “Sprint drills do not in and of themselves develop proper sprint mechanics and may in fact be detrimental. Sprint drills can however provide an opportunity to teach cues that can be used in full speed sprinting, or create desired sensations which may carry over to full speed sprinting. These benefits however are contingent on the manner in which the sprint drills are performed. Sprint drills may also be used to develop certain physical capacities or warmup the athlete.”
    .
    4. Delicate proportionality between the runners mass and ground force demands a method of training that produces superior strength with minimal increase in mass Biomechanist Dan Andrews recently said the following: The role of mass and particularly that caused by hypertrophy has changed or needs to be reviewed in the context of the structure of the individual as a result of training and not to be training for added mass. Frans Bosch said the following at an ’07 symposium here in Illinois: “stop doing hypertrophical training and you’ll be a much better athlete.”

    5. Volitional attempts to alter force on the ground or improve swing mechanics via such techniques as dorsiflexion or pawback are not means supported by locomotion research or the physics of a falling body. Vern Gambetta has gone on record offering his comments on dorsiflexion and the pawback: “Personally this was a vindication because I feel like I have been a voice crying out in the dark on this one. Take home point on this one: forget cueing all the stuff on dorsiflexion. The other one was in regard this idea of pawing. It does not occur; you can’t do it, so forget it.”

    6. Once a runner is up to speed there is little to no mechanical work or forward propulsion required. Runners bounce along the ground like rubber balls maintaining their forward momentum as they bounce up off the surface during each contact period. Corroboration for the spring mass model goes back over forty years: all running animals, from small insects to large mammals, exhibit a center-of-mass motion that resembles a bouncing ball or a pogo stick

    7. Push off in the classical sense of active plantar flexion (force at toe-off) occurs in the latter third of stance phase when forces are minimal. Considering this, active push-off (muscle shortening) is not a means by which athletes apply greater force to the ground.
    Research by Giovanni Cavagna and Dick Taylor, published in the 1960s, 70s, and 80s, suggested that there is little to no requirements for mechanical work and forward propulsion once a runner gets up to speed

    8. Arm swing is often unique to the attachment points, lengths, and hard-wiring of each athlete, and arms in general perform like passive pendulums, providing balance and minimizing center of mass energy losses. Arm swing does not control leg movement, and the amplitude or direction of arm swing is not a contributor of force on the ground. Dr. Ralph Mann drew these conclusions in the 1980’s. “I will emphasize once more,” noted Dr. Mann, “that the hands and arms are not significant contributors to improvement in sprint performance.”

    I can assure you that, based upon the personal opportunities both Mr. Ross and I have had with Dr. Weyand and Dr. Bundle in an effort to grasp these speed mechanics issues as they had presented them in their work, I believe we are not misinterpreting or misapplying the findings or offering positions that they would not find acceptable relative to their studies, or the available corroborative science.

    And I fully understand your position on these matters. It is your responsibility as a scientist to challenge the findings of JAP 2000 if they conflict with what you’ve gathered from your research. That was my original intention when I first visited Dr. Weyand at Harvard, especially since the points of emphasis seemed counter to the techniques and training for speed I had been doing for the first twenty-five years of my coaching career. To my knowledge, no research over the past eight years has challenged or refuted either the support force or swing data from the 2000 study.

    I regret if online discussions with Barry deteriorated to the point that these basic issues were not presented in the right manner. I certainly don’t want to come across as dismissive of the great things you and your colleagues have done for our sport, and I believe Barry feels the same way. As I mentioned to Dan Andrews on his website: I have the highest respect for Dr.Mike Young and his expertise, and the same goes for Vern Gambetta, who has been a coach’s ed “titan” for as long as I can remember. Vern was my instructor for USATF Level I Certification many years ago.”

    Thanks for giving me the opportunity to provide this background.

    Happy Holidays!

    Ken Jakalski
    Lisle High School
    Lisle, Illinois

  15. What’s your opinion on using a trap bar to deadlift?

  16. I like the trap bar although it’s almost closer to a squat than a deadlift since you can (and usually should) start with your hips lower.

    The low back stress also tends to be lower for that reason (torso is more upright) and folks with poor mechanics for normal deadlifting may be better served by using a trap bar.

    Lyle

  17. Fantastic lil write up

  18. Long time lurker here.

    I’m posting this now because, after following a thread started by “banderbe” concerning his deadlift woes, in which you basically call his deadlift a rdl or sldl, I’m now officially confused about what you consider a “good” deadlift.

    On the one hand, your critique of his deadlift makes me think one thing about your concept, but this article makes me think another. In the article, I think your discription, and likely, therefore, your concept of a good deadlift is basically sound. The embedded photos, along with your critique of banderbe’s form, makes me think not.

    Here’s your photo of a “good” start postition:

    https://farm4.static.flickr.com/3495/3843490307_7ff7f44955_o.jpg

    I’ve drawn a line through it to show where the bar would line up relative to the midfoot and her scapula, adjusting for the fact that the photo was taken at slightly off of “exact” profile.

    Here’s your photo of “shooting” the hips. As you can see, this photo shows her in a position that better approximates the setup you describe in you article. This is the setup that you criticize banderbe for, but as you can see, it is the CORRECT one:

    https://farm4.static.flickr.com/3442/3843490437_863f0f8e01_o.jpg

    Please help me understand.

    If you think its appropriate, I can post this over in the aforementioned “banderbe” thread as part of the ongoing conversation there. Basically, I think your “off” or being unfair (read “extreme”) in your critique of his form. Understand that I also recognize that it’s sometimes difficult to accurately critique someone over the internet.

  19. And you’re still wrong, stacey. If you watch the video closely, and realize that this takes more training than just reading a single book, he shoots his hips and back lifts it.

    In that thread, before you got all pissy, he even admitted to getting NO leg drive. That’s not a deadlift because a properly done clean grip deadlift uses leg drive. He shot his hips and back lifted it which is an RDL/SLDL off the floor. Which is why his back hurts. Which is why he needs to get his butt lower.

    A well, drawing a line through ONE PICTURE OUT OF THE GROUP that you think isn’t perfect is missing the entire point.

    The text is correct, the starting position with plates on the bar is correct (getting into the proper position without plates is difficult and I entreat you to try it).

    That one picture that you are obsessed with, I agree that the trainee could have her hips a touch higher. It’s an acceptable position but not perfect. The shoulders are over the bar rather than in front. But if you’d stop fixating on that one picture and pay attention to the overall article, you might learn more.

    End of discussion.

  20. What about the scapula? isn’t it supposed to be in same vertical line with the bar on starting point? I find it harder to lift heavy when shoulder isn’t over the bar at st point (as rippetoe addresses in “SS”) …

Comments are closed.